Computer monitors with TV
 DESCRIPTION:
The appearance, or the buitenbeelden (external view) are the ads that one out of the cockpit to see, in other words, the environment in which it flies, or the scenery.
The scenery for an airliner-the pilot is limited to the airport and the surrounding area, some clouds and a blue sky.
However, the ‘external view’ as good as possible, if you want to enjoy the surroundings (scenery). This can be done in various ways :
- Monitor;
- Flat screen TV's,
- Data projector(s).
PRO'S AND CON'S
In order to make a choice between a monitor or a tv set-up and use of the dataprojectors ("beamers") is a personal choice. Typically, if you opt for a monitor/tv if you're just a little place. Even though the current short-throw projectors can have a lot of resolve to get. Only the size and plaatsinname of the screen, a problem is created.
The data projector (video projector) that is being used more and more by the cockpitbouwers, and especially because, at present, devices with the necessary technologies and capabilities to the board that will improve the picture quality (Full HD).
Also, the use of a ‘Short-Throw’ projector, which allows for the possibility it is coming from a short distance away to create an image, that is a big plus.
The use of a flat-screen cable tv is become more and more fashionable at the time. The current tv's have great image quality (FullHD and 4K) and the price of a projector or a big screen tv, are now at each other, daring. For not that much money when you already have a 65 " tv. Thus, the decision to use it is definitely worth the effort ...


Monitor/TV
Pro
- Comes in handy in a small space
- Very good image quality (colors, contrast, and the black color is really black);
- Use of natural light.
Cons
- Affected by the screen-borders (bezels);
- A little sense of space and depth perception;
- Crabbing/ sideslipping effect;and
- With big screen tvs due to its size and weight, it is difficult to work with.
Data projector(s)
Pro
- Great ‘together’ display.
- A sense of space and depth perception.
Cons
- The picture quality is less than that in the SCREEN;and
- The duration of maintenance (light bulbs!);
- The rapid deterioration of the DLP/DMD chip (white pixels);
- The additional costs for the purchase of the Wrapping/Blending software.
- A little complicated to get all the displays are correctly set (wrapping, and blending);
- Fan sound.
Conclusion
The use of projectors, with plenty of space or room is the best choice for you.
Unfortunately, I have a limited amount of space with the use of a tv in such a situation, the best solution is.
The further explanation is, therefore, how do I get my TV setup I have done. All of the info, it is a combination of the tips and experiences of other cockpitbouwers TV's for computer monitors. And, of course, our own experiences will be discussed.
The PURCHASE
I've got 3 FullHD/4K " tvs is purchased from the brand of Philips, with a screen size of 65 inch (165 cm). What certainly played a role in my choice as it is a cheap price at the time of purchase.
INSTALLATION
So as to be in position to win, and on the floor as much as possible, to keep them free, I decided to get the new flat screen tv's hanging on the ceiling.
The stands are on the floor and that the tv's are mounted do have a sensitive center of gravity, which makes them easy to tip over. Therefore, the bottom sides of these uprights to the floor is to be mounted or bolted to the platform from the cockpit.
This should be each of the stand also has enough space at the rear and on the side of the cockpit. A disadvantage of this is that the tv stand is difficult to move to any work on the flight deck. Therefore, it is my choice to go with the new flat screen tv's hang at the ceiling with a rail system.
BRACKET AND RAIL SYSTEM
I have special hangers are purchased that are suitable for a large-screen tv's including a 65 " tv. These brackets can bear the weight of up to max. 45 Kgs.
These ceiling mounts I've purchased Allekabels.be.
In the brackets, can I get a 180° rotation and 15° of forward / back tilting. You can also have the tv on the bracket, to the left or right.
The 15° tilt is, however, difficult because of the weight of the tv is a great deal.
The tv bracket, I mounted it on a rail with a roller system, so I put the tv in maintenance on the flight deck, you can remove it to the rear. Also, this system is very useful to have the tv on in the correct position.
This is the rail with the rollers are usually built-in wardrobes with sliding doors. The rail with the rollers 60 Kgs to carry.
They are on sale in It, or at the local do-it-yourself stores.
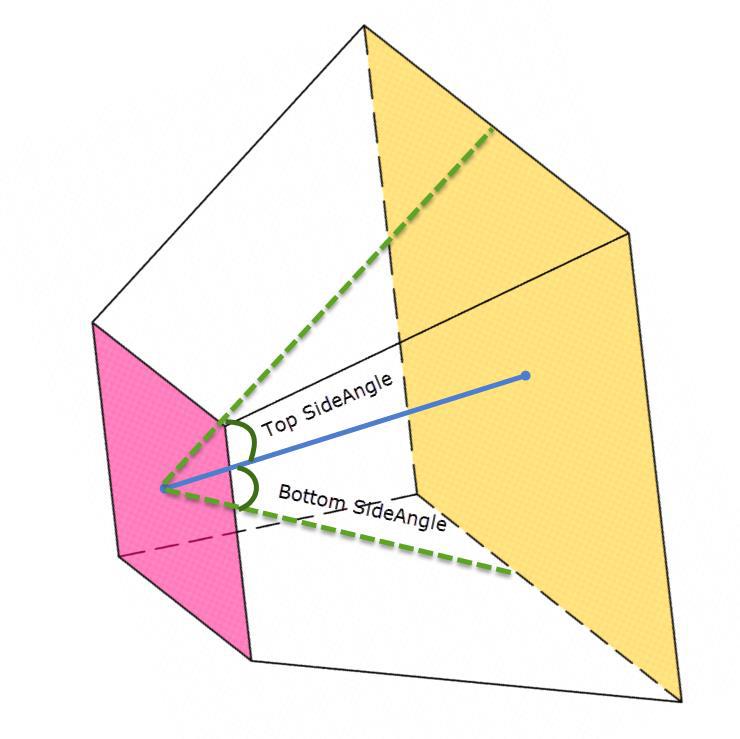
To get to the rail with the rollers in the right position to confirm it, I did have to take the form of the tv, cut out of cardboard and used it as a tool to get the right position of the screen, and so the bracket has to come out with the rail. The reference point is the center point of the outer shape perpendicular to a point on the ceiling.
In front of the tv on the side, should I have the cardboard form and placed at various angles.
You are always in the middle of the cardboard in the shape are perpendicular to the top of the rafters projected. The track will then be in line to be placed on the ceiling, matching it to various points on the ceiling.
Then later on, you have multiple choices of the angle of the tv to the best place.
These are the available angles for the placement of the tv's are, of course, depending on the space available to it. The greater the spacing, the larger the angle, that can be made. You may for example, the angle is reduced, so that the tv is parallel to the first side of the dashboard (over 65 degrees) or the angle of the opening position (45°). It depends on the personal preference of the Field of View (FOV).
WEIGHT
The two problems with mounting the tv:
- The weight to be carried;
- The exact physical arrangement of the tv (the edges should be close to each other, and everything must be level and at right-angles).
The weight is quite a bit:
- Tv weight: 23,5 kg length
- The weight of bracket: 6 Kgs
The total weight of the rail with the rollers to wear, it is a +- 30 Kg in weight. Of the rail with roller system can have a weight from 60 Kgs to carry . So, this is not a problem at all.
But the ceiling itself is over 30 Kgs of (90 Kgs)? Why do I get the rail mounted, the ceiling and back, with heavy braces against the heavy cross-beams of the attic. And all of this at a 3 or 4 mounting points per rail. The ceiling is completely relieved, and everything is driven by the cross-beams of the attic.
As for the brackets, and hang in a rail and the mounting bracket, which is susceptible to movements. Due to the weight of the bracket and tv to keep things stable.
For a horizontal adjustment of the tv (for leveling), I made it to the top of the mounting bracket of a no-load absolutely are mounted on the ceiling, press it, and it's mounting bracket, which allows for tilting to a certain direction, so that the tv will be level, adjusted correctly, can be used.
In order to make the edges of the side tv's to connect it to the middle, would be great if I get to the back side of the screen to the left and right sides of a home-made bracket mounted to the edge nicely against each other.
")
")
")
")
")
")
")
")
")
")
")
")
")
")
")
")
")
PLAATSINGSHOEK OF THE TV
As has already been said, it is the choice of the angle at which the left-hand and right-hand screen to be prepared is a personal choice, and depends on the location of the space in which it is possible FOV's.
The outer corner varies from 45° to 65°. Some prefer it to the tv as short as possible, at the cockpit in place. It may be that the people in the vicinity of the pixel, and the viewing angle for the tv to be on their toes, whereby color deviation occurs.
From a wider angle, you risk the outside edges (bezels) seen on the screen, and the kameromgeving.
It is a compromise between the two systems.
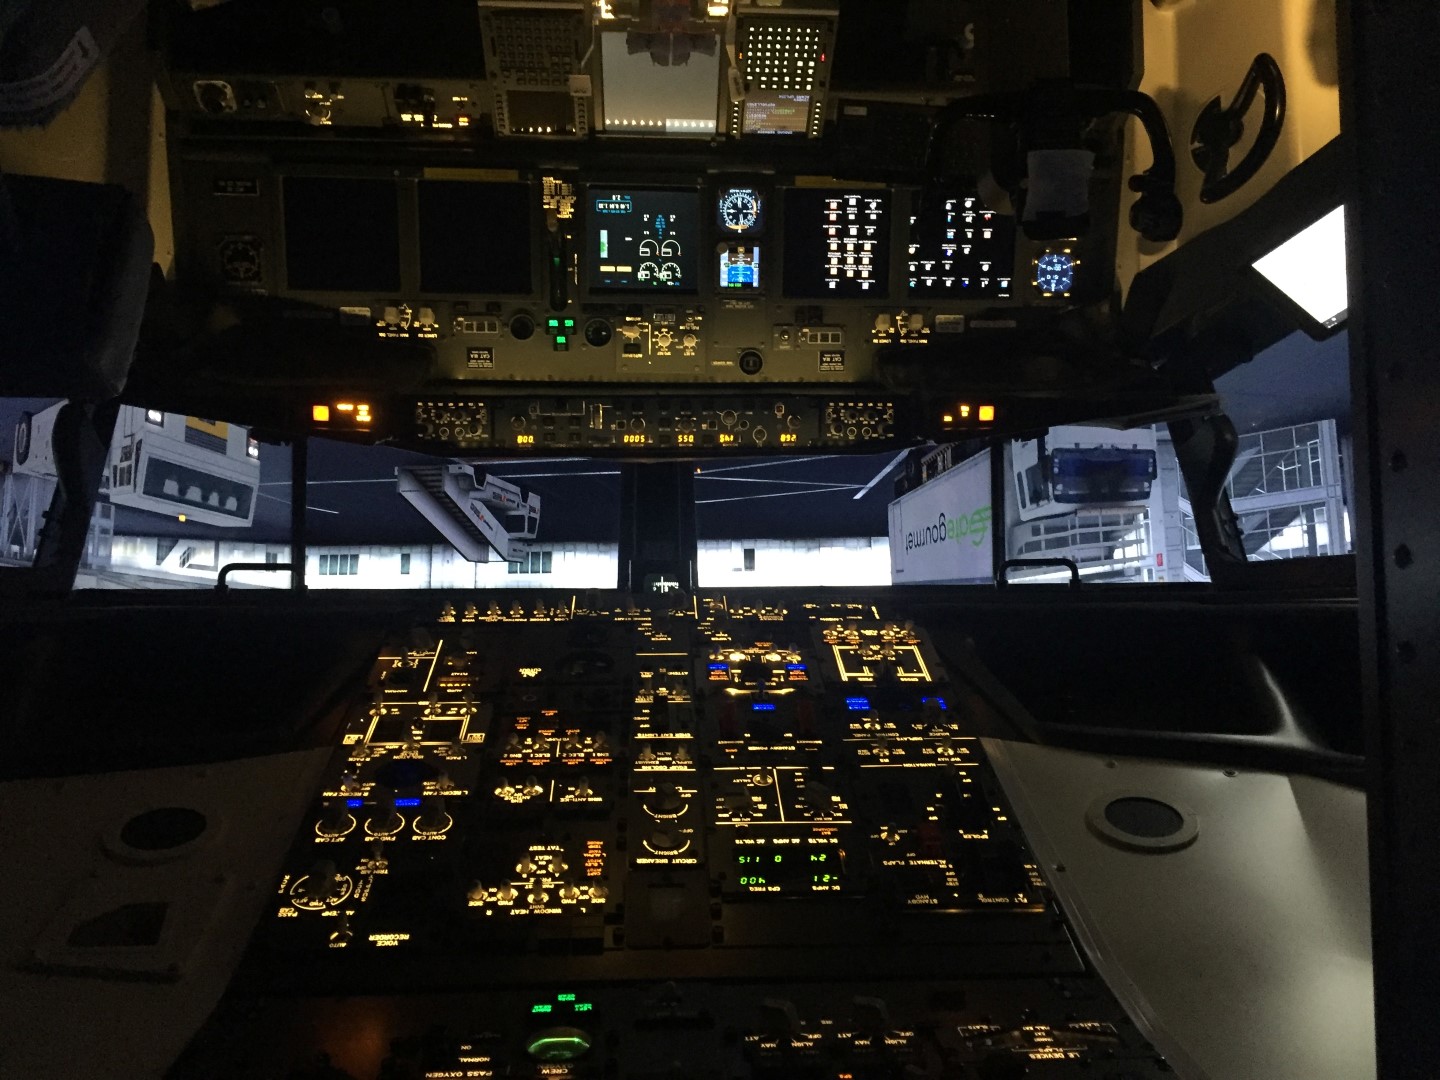
In the front, would be great if I was almost at the cockpitframe to be placed. My viewpoint (eye) to the center of screen is Up to 130 cm.
For me, personally, it was the establishment of 65° (outside corner) is too close to the edge of the flight deck. The tv's were put in parallel with the side, but it was too short, so the image is no longer sharp and clear. Also, the viewing angle is slanted so you are in the corners and in the middle screen, not a clear image, you may want do with the color change.
My side to side, the tv's are on of external corner hood fitting with a 58°. The tv's top edge (insert) on the Capt side, I don't see. The left-hand screen edge to edge, at the bottom, I could see a little better. The left-hand side of the left-hand screen, we see a little bit. When the card stands up I can see these outside of nothing. This is mainly because the background is black has been painted. All of the other tv's, I don't see the edges only, so that the vertical edges in the center).
I've also noticed that there are difference's in the different views. This hotel is located in the kleurafstelling of the screen, but due to the different angles of vision.
As a golden rule, that I have in the meantime I have learned is that it is the only point of reference is the place from where your eyes are in the cockpit, (eyepoint). d.w.the position of the eyes in the Capt seat. The rest of it doesn't count. In the cockpit, everything looks different (color, brightness, aflijningen).
For a small cockpit like on a single seater, and no other F/O's side, these problems are less and less.


THE 3-VIEW IN P3D
3, an external view on the various screens, work together to determine whether to generate and there are a variety of options are available:
- NVidia Surround or Eyefinity Technology.
- P3D Viewgroup Management.
- FlyElise Immersive LCD-PRO;
- Manually, through the development of the 3 different camera settings in the camera.cfg
NVidia Surround and Eyefinity Technology
Both methods do the same work, and they extend to the middle image over the 3 monitors. The NVidia Surround will be used with the NVidia cards, and the Eyefinity on the AMD Radeon cards on the market.
With this technique, it is practically the simplest method, but it is not very realistic. This technique stretches it out and makes it, therefore, is not a new view. The problem with that is that it is easy to have a ‘fisheye’ effect, and that is not good.
However, this ‘fisheye’effect, you can be helped:
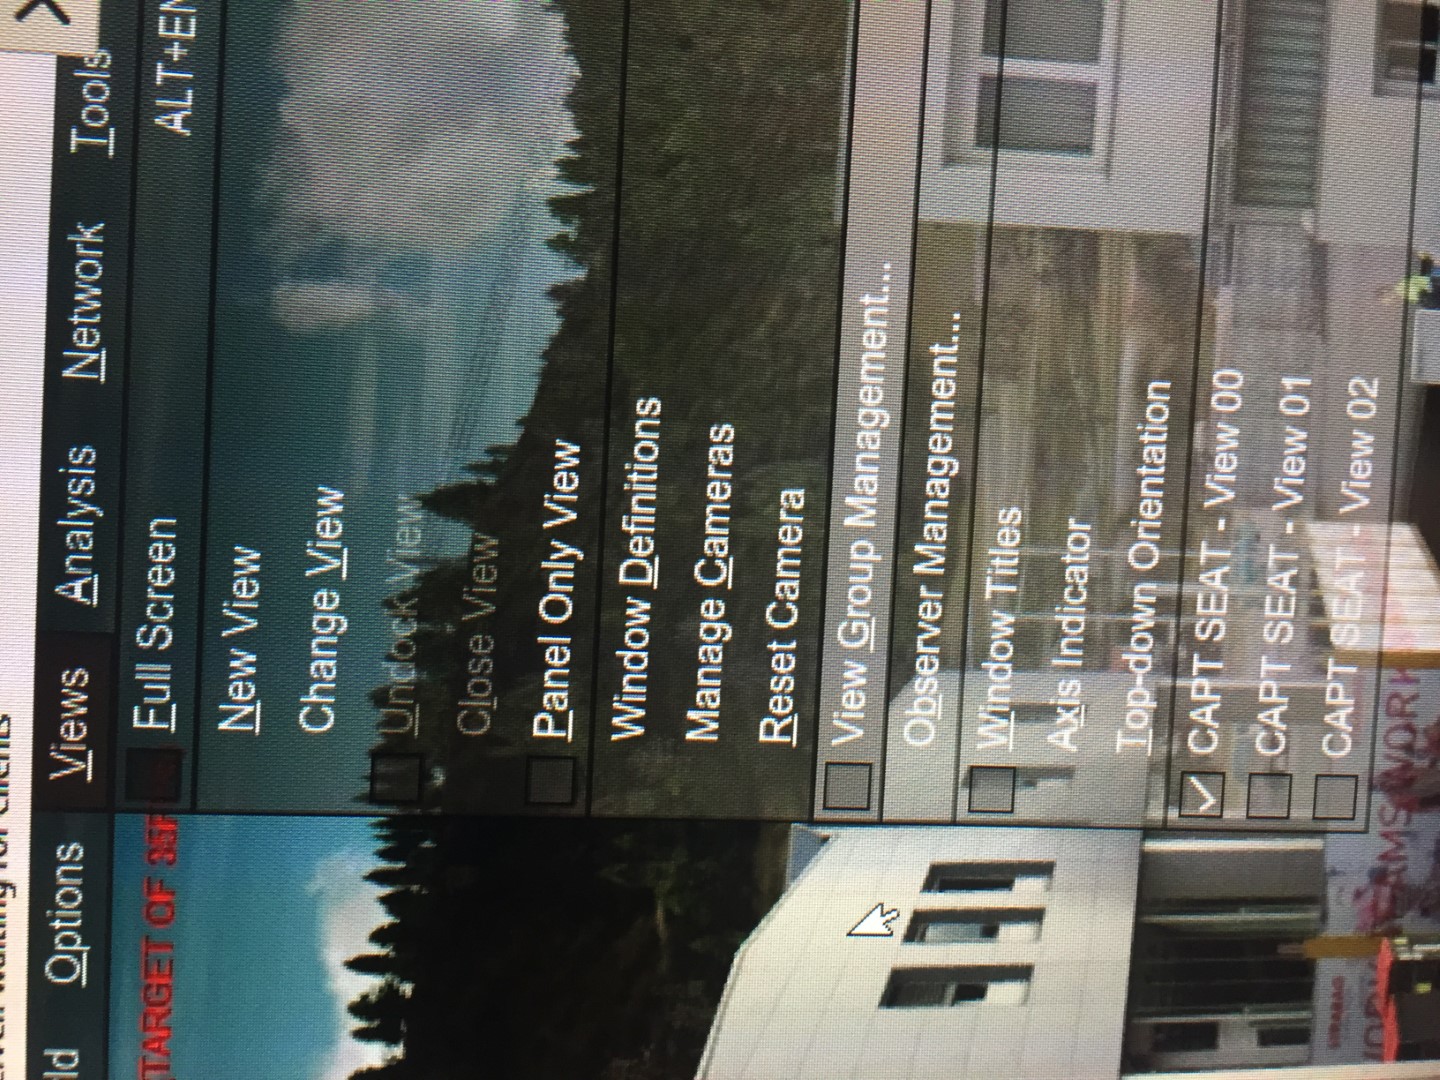
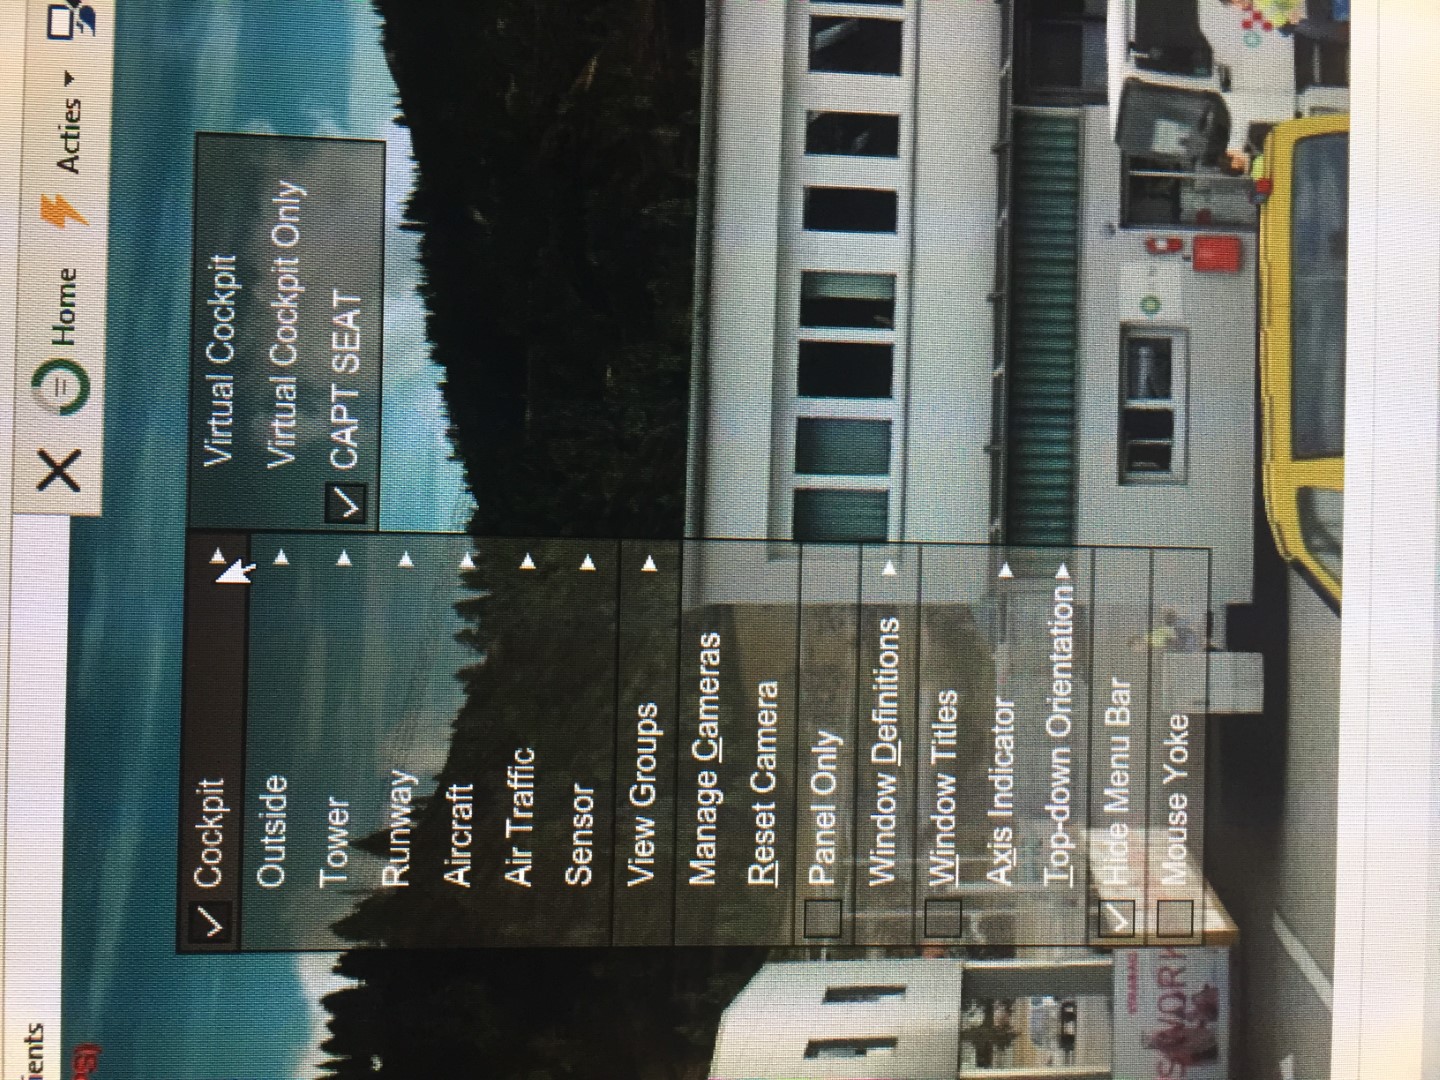
- Open the Menu and taskbar in P3D;
- Go to View;
- Go to Manage Cameras,
- Fill in a name for the new Camera view;
- At the right is from the list at the bottom, check “Wideview”;
- Set the zoom to you, it is best to 0.31 –> has to be higher than 0.30 );
- Save as a Scenario.
An advantage of this Surround sound system is that you have almost no frame-rate hit " is obtained. So there is little loss in frame rate.
I would recomend it for "real" cockpitbouwers ...
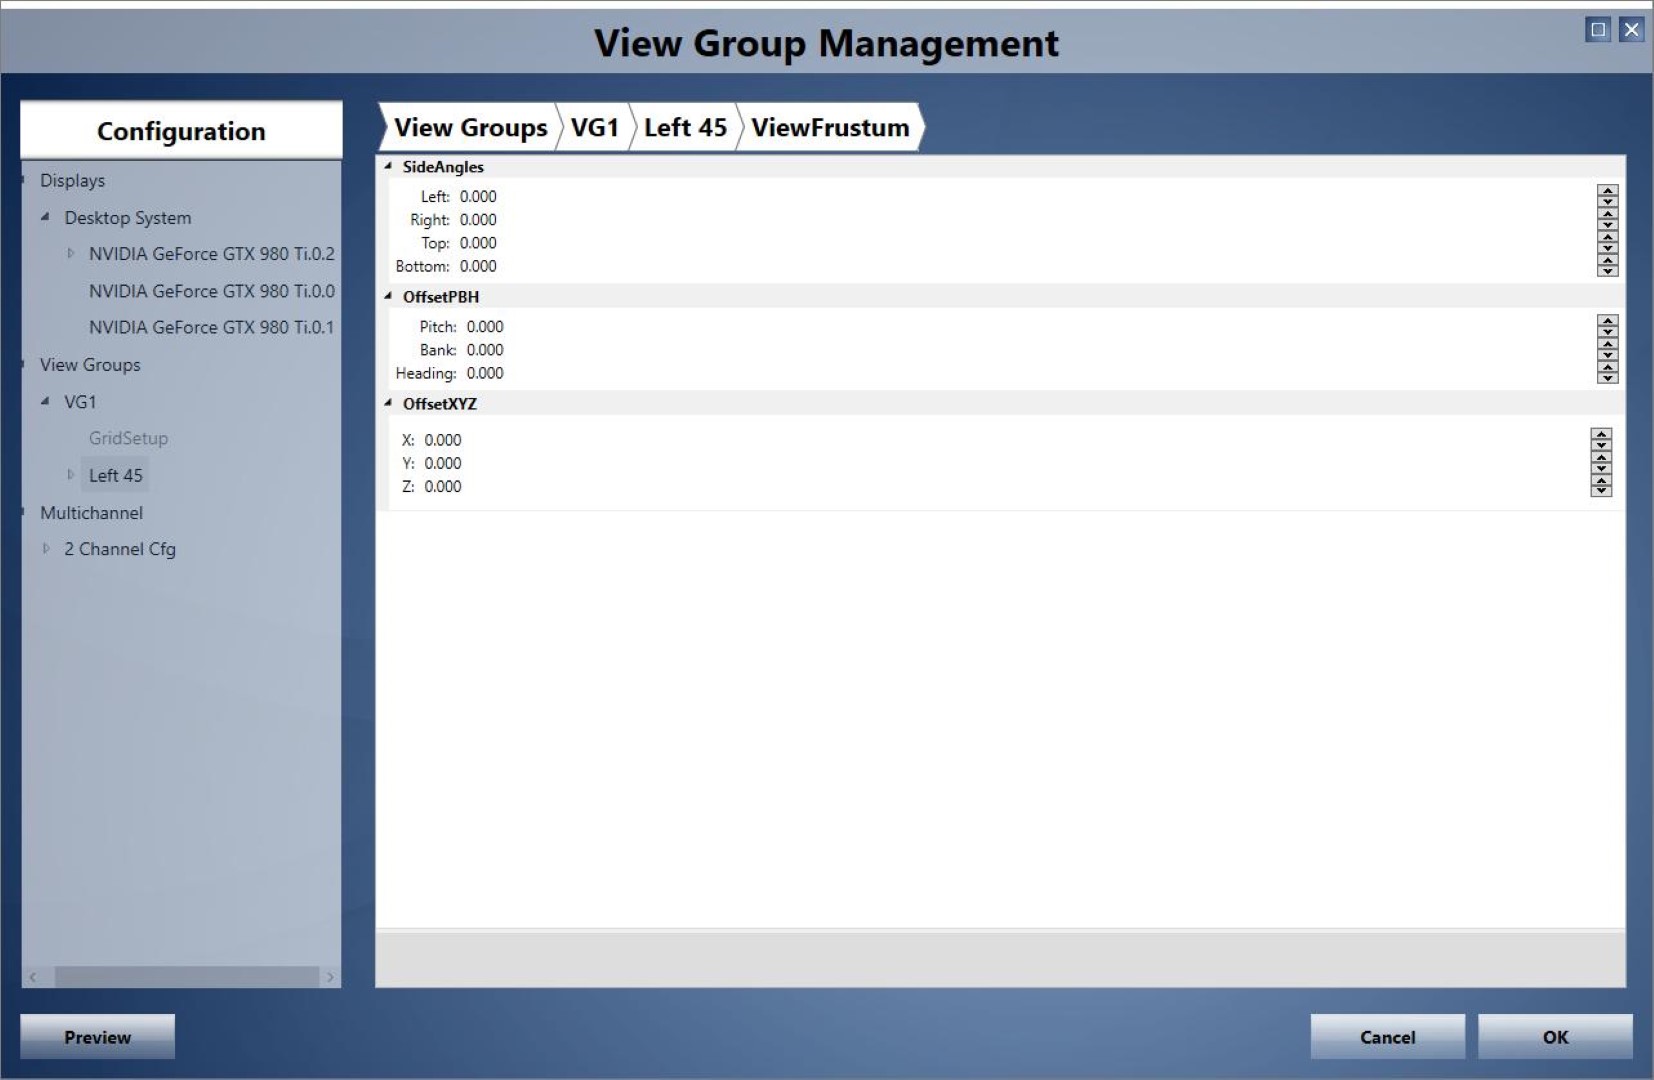
P3D View Group Management
View Groups is a new feature in P3D v3.3 which is a series of “views” can be created, which you can think of it as “camera”). This function is primarily intended to assist in the management of multi-monitors, TV's, and it is also used as the basis for the re-introduction of Multi-Channel (i.e., network and PC configuration. Even though the multikanaalfunctie is only available in the Professional Plus version of P3D, can be used in all versions, the ‘View groups’ are created and used.
By Prepar3D can be automatically and displays can be generated on the basis of a definition of the number of monitors you have and how they are physically arranged.
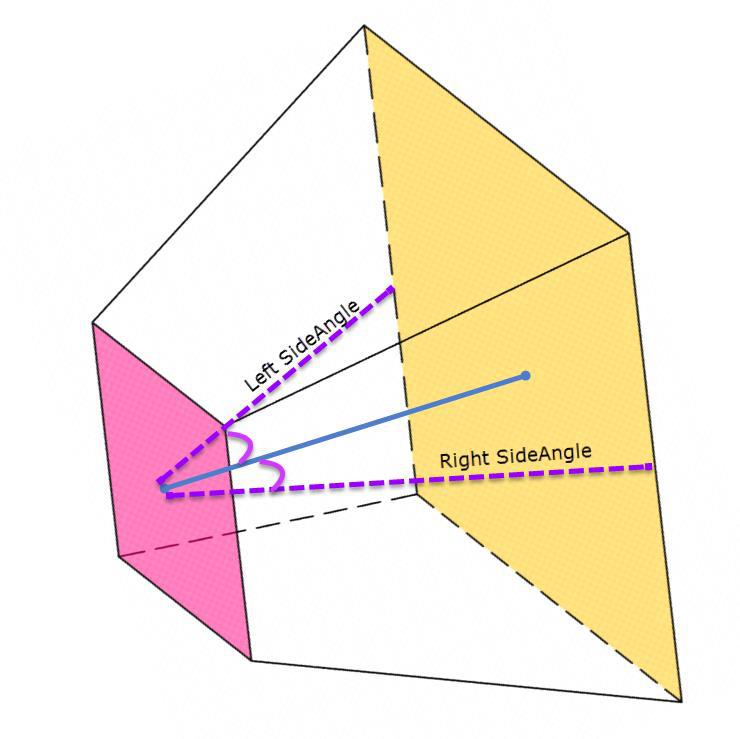
In the menu of P3D>View,> you can P3D View, the Group Management type. This will take you to the in-house program where you get a viewgroup.xml " you can create, where you have the 3 views for the 3 scenes together, and which are geometrically defined. It's a "feature" of the P3Dv3 or more.
Ex. a straight line that starts at the left-hand screen, in a straight line and extend in the right-hand screen, and this is, without a corner or a gap forms, e.g., the horizon, the gebouwaflijningen, aflijningen of the runway, etc.).
Also, the SCREEN edges is no interruption in the keep: d.w.the scenery must be in the borders (bezels) to go through. Therefore, you must have the correct dimensions and values are entered into the program.
It is not easy to do without a lot of explanation, it is hard to get a good result. Fortunately, there is a good guide on the Internet written by Marc Hargrove.
It is a step-by-step guide for comprehensive explanation of how the different views will need to be in each other during the year.
*** Prepar3D View Groups ***
I have used this tutorial several times, read it and then make the necessary calculations requested in the instruction manual . Then, Viewgroup program for P3D is started, and everything is carried out in the operating manual. But be careful, mistakes in filling in the values is obvious. The Focus, the focus is in the message ...
The result, after that is was just about perfect. Everything was covered, and geometry.
The 2 views (view1 and view2) can be then be dragged and dropped into the left-hand and right-hand screen.
It is subsequently recommended that P3D is about to go into Full-Screen mode, otherwise in "undock" mode jump " to different views and return to the center of screen for any menuaanpassingen of P3D.
FlyElise Immersive LCD PRO
Immersive LCD-PRO is a program from the FlyElise that is, the work for which ‘View-Group-Management’, in P3D it does. It is, therefore, an interface that is user-friendly and easy way to a viewgroup.xml’ create the contact. So this is it viewgroup.xml " there are all of the codes that are required for the 3-view.
Also can be used in Immersive LCD-PRO is the eyepoint to move. You can download the trial version for 30 days.
On the website of the FlyElise is there a manual that explains everything on how you need to use it. This manual is not as detailed as the ‘Viewgroup’-a manual by Marc Hargrove.
With all the necessary information (dimensions, opstelhoek resolution TV's) and it is within 10 minutes ‘viewgroups.xml’ will be set up.
However, I have to report that, despite the appropriate geometrical delineation, in their 3D model, the result is not quite correct, it was in P3D.
I have, for example, a set-up attempt, with a SCREEN set-up is 65° (outer corner), and the results were not entirely accurate. According to the FlyElise it would be to have a screen resolution that isn't compatible with Immersive LCD-PRO , which I doubt (I have a custom screen resolution).


In the configurations of, for example, 58° (outer corner), the results might be ok.
Several cockpitbouwers are obtained are often in a better performance with P3D View of Group Management, with Immersive LCD, PRO's. Nevertheless, with tilt angles of about 45° to 58°, and the results are very good. So, no fiddling with calculations, parts of the frustrumwaardes, etc.
The price of LCD-PRO, at the time of this writing, costs €150 per year. Within 10 minutes of your time you will have with this program Viewgroup.xml will be created. When everything is nice and aligned, and the images are geometrically well, it is the role of Immersive LCD-PRO on it. Theoretically, a once-only use. Not that it's cheap.
Your support and assistance if you have any problems or questions FlyElise, it is very fast, to name a few. Within an hour or two to get a response. But that answer is often too long and not detailed enough, or it is not at all clear.
The Camera settings in the camera.cfg
A last option would be to get the 3 views to generate is to be manually, all the data is in the camera.cfg. For each and every screen (i.e. every camera is a separate view will be created in the camera.cfg. You can put them e.g. in POVLeft, POVCenter and POVRight name a few.
You can use the zoom and rotation values in the Viewgroup.xml and you have been through Immersive LCD-PRO is to use your custom camera settings to the post.
Next, open the two ‘sleep view’ and then drag and drop it into the respective tv channels. Then you have to select the ‘custom camera’ from each of the 3 views. You can then take the images aftunen to zoom and/or rotation, so that the aflijningen right.
I have this method that is not itself tested.
Example of a TV Setup for using a Camera.cfg
Note. There are more methods to use the different views to generate, such as, for example, the editing of it .the xml's, but I have no experience with it.
FRAME RATES
The frame rate (fps) for the cockpitbouwers with multiple projectors or tvs is a controversial issue and is often a pain-in-the -...’.
We're staring at us, often blindly. What is the meaning of sufficient fps in the sim (i.e. P3D)?
A simple answer is: when everything is smooth moves, both on the ground and in the air.
Usually, we get a frame rate drop or a hit song (stutters) in the heavy-duty airport-self made areas (e.g. FlyTampa-self made areas such as the LEMD, or EKCH)).
Often, we will attach a number at the first counter, which we will see in the upper left-hand corner. It is also the only way to do it is to measure it. In most cases, the fps counter is limited to be between 25 and 35 images per second. But with less of the well to the "smooth edge".
My wife was with much apprehension to see what the end result would be a 3-screen in FullHD.
The results were generally satisfactory. If necessary, a second video card and install it here is out of the question.
- Kastrup (FlyTampa): 42 fps
- Brussels, belgium (JustSim): 43 fps
- Leading up to the ORBX): 49 fps – for example, CPU 39%, and 35° c – GPU Temp is 51%, and 63°
- Nice (P3D): 51 fps
- Munich (Taxi2Gate) : 46 fps
* Resolution: 1080p (1920×1080);
* * * * In P3D, all the graphics-sliders at about 75%;
* ‘Traffic’ is totally off (When Traffic setting is on the max alone, I have a frame drop of about 7 fps);
* With the ‘Traffic’ on the maximium (with a very, very busy traffic, and on a heavy airport with a very bad weather with lots of clouds and rain (Active Sky), I have a fps of 25;
It is a little bit of the proper adjustment of the P3D is able to find where you are happy with. The more you ask, the more frame rates it's going to cost you ...
My system configuration is (by march 2018):
CRABBING/SIDESLIPPING EFFECT OF
A disadvantage of the use of the tv's, and projectors, at a short distance, it is ‘crabbing’ or ‘sideslipping’ effect. Well, when using my projector in the past and the present, the use of a tv do I have this negative effect.
Reason: in the center of the middle screen is too short, etc.oh.d. the eyepoint and the eyepoint is not on in the middle of the middle screen.
Note. the distance between my "eyepoint", and the screen is 130 inches.
If you are in the Capt seat is, the "eyepoint" in the left-hand portion of the center screen. Then, with this ‘eyepoint’ once the shortage is removed from the screen, you get a distorted picture, where, for example, the aircraft is perfectly lined up with the runway centerline, but outside of the cockpit, pointing a few degrees to the left. As a result, a sideslipping takeoff, and, therefore, even in a ‘named’ in a final approach, and landing run (then there is no crosswind). Not so ...
How can we solve this problem?
In the single-seaters, where the tv is in the middle of the state and, therefore, where the "eyepoint" in the middle, this ‘crabbing’ effect, does not easily occur. Even if you are far enough away from the tv and tv sets have that problem, too. Only on a tv that is more difficult to achieve because of the small size of the screen.
The goal of this project is the position of the eyepoint in P3D, " a few degrees to the right, and in the extension of the runway.
You can do this in the FlyElise Immersive LCD-PRO by the physical eyepoint to move it to the left (the position in the Capt seat).
On the other hand, you can get into the camera.cfg manually to the "eyepoint" on its axis and let it rotate to the right. You can then use it on the camera.cfg refer to as ‘the Capt Seat’.
It should, however, be noted that the two images on the left and right of the tv is also involved. M. a.w. on the right-hand picture, you'll be able to actually see it on the left screen. Everything revolves on its axis.
These changes can also be done in P3D the View of Group Management, but it should be in each view so as to fit in. By using the camera.cfg this is happening at the same time.
Only you will see only the center view, and then in the delineation, and the geometry of the other view ...
Look out!" If you have a view created in the Capt seat is only suitable for use in the Capt seat, and, therefore, not coming from a different location (eyepoint in the cockpit, the F/O passengers). It is from a place other than a distorted image.
Do you want to have a correct view to have is the F/O then you need to have a new view created from the position of the F/O.
In the P3D menu View, you will have the possibility to switch between Capt Seat, " or " the FO Seat’.
In order to have the material from the different views (cameras) to better understand it, I can refer to the following link: Cameras in FSX/P3D
Simultaneously, you also want to have the pitch control on the view. Here we will find how many degrees we are policy to be able to see that they have a more realistic view from a real cockpit.
Improvement In Cancer/Sideslipping Effect Of
ZOOM
If you have a Viewgroup.xml generated by Immersive LCD-PRO LCD-PRO, a zoom ratio is to be calculated in the .xml. If you go to FS, this change will be in their element aflijningen, and the geometry is no longer. Not a good idea to do so.
The zoom is a little bit of optimizing, which is the best airport to have a long, wide building. A building that starts in the left-hand screen, and at the end of the right-hand panel.
The delineation of the building should be in a straight line from the left to the right. The 2 side shields may not be a corner of the building.
With zoom to play you can test this out and aftunen.
In my TV setup, the zoom can be adjusted between 8.5 and 1.0.
THANKS TO
The different tips and advice on how to come out of cockpitbouwers on the Prosim forum. For which I thank you very much.
- Fooflighters (Dennis)
- NIgravity Presentation
- Chris08 (Chris)
- RCarlson (Ross)
- CBruce (Charles)
- Daehee Kim (Kim)
- Pelsrijcken (Koosch)


Translated by Yandex.Translate and Global Translator


