GreenPiThumb: A Raspberry Pi Gardening Bot
Introduction 🔗︎
This is the story of GreenPiThumb: a gardening bot that automatically waters houseplants, but also sometimes kills them.

The story begins about a year ago, when I was struck by a sudden desire to own a houseplant. A plant would look nice, supply me with much needed oxygen, and imply to guests that I’m a responsible grown-up, capable of caring for a living thing.
But I’m a programmer, not a gardener. If I had a plant, I’d have to water it and check the plant’s health a few times per week. I decided it would be much easier if I just spent several hundred hours building a robot to do that for me. If the plant lives to be 80 years old, I come out slightly ahead.
Why GreenPiThumb? 🔗︎
Like most software projects I take on, my main motivation with GreenPiThumb was to learn new technologies. I wrote my previous app, ProsperBot, to teach myself Go, Ansible, and Redis. I saw GreenPiThumb as a chance to learn front end development, specifically JavaScript and AngularJS.
My friend Jeet had just started learning to program, so I asked if he’d be interested in collaborating with me on GreenPiThumb. It seemed like a good opportunity for him to learn about healthy software engineering practices like code reviews, unit tests, and continuous integration. Jeet was up for it, so we set off on what we thought would be a two- or three-month endeavor.
Powered by Raspberry Pi 🔗︎
The Raspberry Pi is a small, inexpensive computer built for hobbyists. People have used Raspberry Pis to create futuristic smart mirrors, run old video games, and drive electric skateboards.

I’ve been playing with Raspberry Pis for the past few years, but I’m a software guy, so I had never used them for anything more than cheap toy servers. For most of the enthusiast community, the Raspberry Pi’s main draw is how well it integrates with consumer electronics.
With the number of sensors and integration guides available for it, the Raspberry Pi was a natural fit for GreenPiThumb. I figured using the Raspberry Pi would also challenge me to learn its hardware capabilities and finally figure out what those “GPIO pins” actually do.

Raspberry Pi and its mysterious GPIO pins
Why make another Raspberry Pi gardening bot? 🔗︎
We were certainly not the first people to think of building a Raspberry Pi-powered gardening bot. Two cool projects that preceded us were PiPlanter and Plant Friends, but there have been a handful of others as well.
We decided to build our own for two reasons: it’s fun to make your own stuff, and we wanted our bot’s software to be a first-class concern.
The majority of Raspberry Pi projects are created by enthusiasts who are great with electronics but don’t have professional software experience. We wanted to be the opposite – great software, but the hardware barely works and sometimes gets so hot that it melts our breadboard.

An early prototype that likely had a “catching on fire” problem
The code for GreenPiThumb is open-source and features:
- Full unit tests
- Code coverage tracking
- Continuous integration
- Debug logging
- Thorough documentation – both READMEs and code comments
- Consistent adherence to a style guide
- An installer tool
Hardware architecture 🔗︎
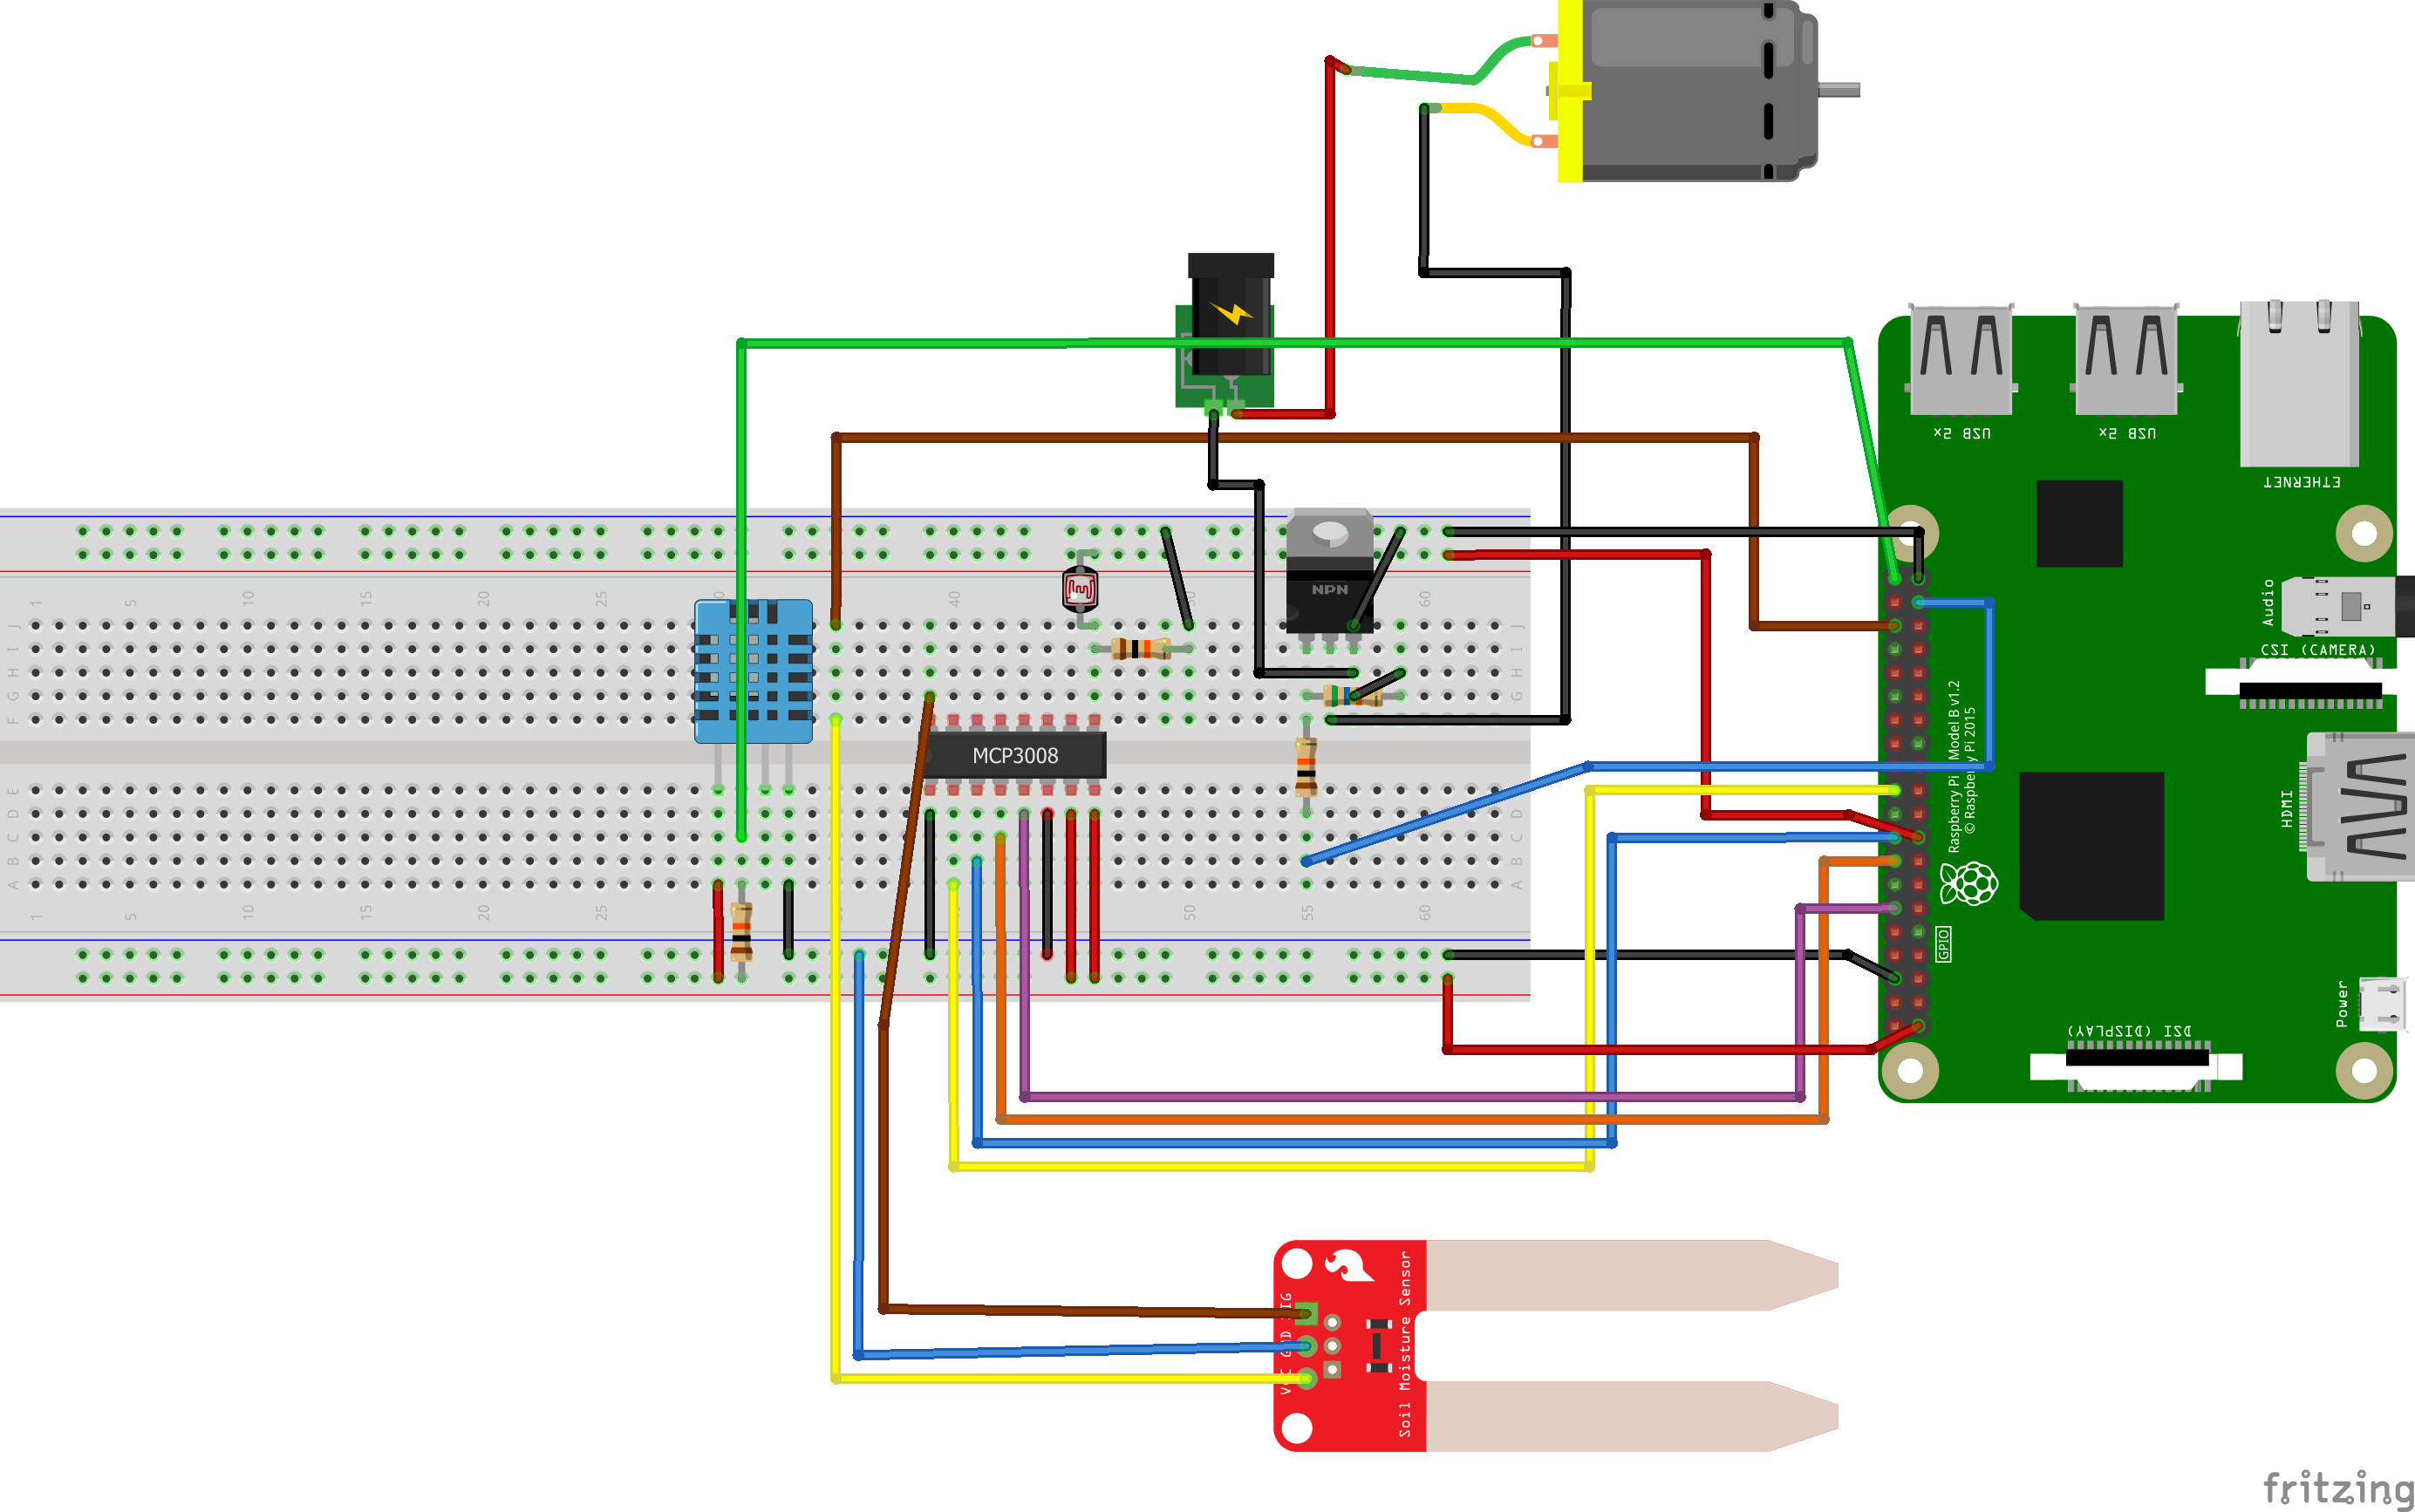
GreenPiThumb wiring diagram (downloadable file)
The Raspberry Pi reads digital signals, so it’s not capable of reading analog sensors directly. We use the MCP3008 analog-to-digital converter to produce digital readings from the analog soil moisture sensor and light sensor.
The DHT11 sensor detects temperature and humidity in the air. It produces a digital signal, so it can plug right into the Raspberry Pi.
Lastly, we have a 12V water pump, but the Raspberry Pi can only output 5V, so we connect a 12V power adapter to the pump in series with a MOSFET. The Raspberry Pi uses the MOSFET as a digital switch, breaking or completing the circuit when it wants to turn its pump off or on.
Software architecture 🔗︎
GreenPiThumb software architecture
GreenPiThumb back end 🔗︎
The back end does the heavy lifting of GreenPiThumb. It’s a Python app responsible for:
- Managing the physical sensors (soil moisture, temperature, etc.)
- Turning the water pump on and off
- Recording events and sensor readings in the database
GreenPiThumb web API 🔗︎
The web API is an HTTP interface that serves information about GreenPiThumb’s state and history. It’s a thin wrapper over GreenPiThumb’s database. It translates everything into JSON, which makes it easier for web applications to understand.
GreenPiThumb web dashboard 🔗︎
The web dashboard shows GreenPiThumb’s current state and creates graphs of sensor readings over time.

Our Raspberry Pi isn’t quite up to the challenge of acting as an internet-facing web server, but here’s a static mirror of the GreenPiThumb dashboard that’s identical to our local one:
Deployment 🔗︎
To deploy GreenPiThumb to our Raspberry Pi device, we use Ansible, an open source IT automation tool.
We created a custom GreenPiThumb Ansible configuration (or “role” in Ansible terms) for deploying all of the software GreenPiThumb needs. The Ansible role downloads and installs GreenPiThumb’s back end and front end code, as well as the third-party software components that GreenPiThumb depends on.
With just a few commands, you can use this tool on a fresh Raspberry Pi device and have all of GreenPiThumb’s software up and running within minutes.
Bumps along the way 🔗︎
GreenPiThumb took over a year to complete, much longer than expected due to roadblocks that halted progress for weeks at a time. I’ve described some of our more interesting obstacles below.
Water distribution 🔗︎
The other Raspberry Pi gardening projects don’t talk about how they spread water over the soil, which is a shame because we still haven’t figured it out.
The first time we pumped water into our planter, the tube directed a small stream into one spot, completely soaking that area but leaving the rest of the soil dry. We considered coiling the rubber tubing around the inner wall of the planter and poking holes in the tube, but we weren’t sure if this would get enough water to the center part of the soil. We tried using a showerhead, but couldn’t figure out how to fasten it water-tight to the tubing and still control the stream’s direction.
We ultimately settled on “spray and pray.” It was a solution borne out of looking around my apartment and randomly grabbing things that might solve our problem. We cut a finger off of a small kitchen glove, fastened it to the water tube with a tightly doubled rubber band, and made lots of holes in the glove using a sewing needle and nail clippers.
We turned on the pump, and the severed finger of the glove immediately shot off the tubing, spraying water all over my apartment’s wall. We reattached everything, but this time, stuck a safety pin just in front of the rubber bands so that they couldn’t slide forward.


Kitchen glove turned water distributor
It’s not the most elegant solution, but it mostly works.
The gardening part wasn’t supposed to be hard 🔗︎
Electronics were supposed to be the big challenge of GreenPiThumb. Gardening didn’t seem that hard. Green beans, in particular, are frequently described as a hardy plant that requires only basic gardening skills to grow.
It turned out that we didn’t have basic gardening skills. GreenPiThumb is intended to automate the human part of tending an indoor garden, but to automate anything, a human has to know what “correct” looks like. It was hard to decide whether GreenPiThumb was watering too much or too little because we ourselves had no idea how much water to use. That’s how we ended up accidentally making this horticultural snuff film:
How hard can it be to measure moisture? 🔗︎
Our most vexing problem was dirt.
When we set out to build GreenPiThumb, we expected that soil moisture would increase on days we watered the plant and decrease on days we didn’t. GreenPiThumb’s job would simply be to maintain the correct moisture level by adding water whenever the reading dropped below a certain threshold.
Below, we’ve used expensive and complex modeling software to visualize the soil moisture pattern we expected for GreenPiThumb:

Soil moisture pattern, imagined
Bad readings 🔗︎
Soil refused to cooperate with us. In our initial build, the soil moisture reading oscillated from 95% to 100%, then slowly converged to ~99.5%. We took out the soil sensor and tested it against different media: air, water, a wet paper towel, our hands, totally dry soil. All of these things seemed to get sensible readings, but soil with any kind of moisture made the sensor shoot up to nearly 100%.

Soil moisture readings, original moisture sensor
We originally used Dickson Chow’s Plant Friends soil probe, but we swapped it out for the SparkFun soil sensor. The new sensor got a reading of 82% in damp soil, and it would jump to 85% immediately after the soil was watered. Within a few hours, however, it would sink back down to 82% and remain there for days. The sensor seemed unable to distinguish between soil that was watered three hours ago and soil that hadn’t been watered for five days.

Soil moisture readings, SparkFun moisture sensor
I think my dirt is broken 🔗︎

Maybe it was the dirt’s fault. Our potting soil was this pre-packaged mix from Miracle-Gro that featured an “easy to water formula.” A bit suspicious, no? Clearly, this was evil, genetically engineered dirt that never dries. That’s why our poor soil sensors were so confused.
We needed dirt that wouldn’t play games with us, so we purchased this organic potting mix. As a test, we filled a plastic cup with the organic soil, added water, poked holes in the bottom to let it drain, then let it sit for three days to match the soil conditions in our GreenPiThumb planter. At the end of three days, we tested our sensor in both types of soil.
We got the exact same reading: 82% in each. So, we couldn’t blame the soil…
Giving up 🔗︎
Out of ideas, we revisited the projects that inspired GreenPiThumb. How did they solve this problem?
Plant Friends doesn’t pump water at all. PiPlanter measures the soil moisture, but waters on a fixed schedule, regardless of moisture level. Some Googling turned up a few Raspberry Pi gardening projects that claim that they water solely based on soil moisture, but none of them publish their source code nor share their result data. Therefore, we felt it was fair to assume that watering based on moisture level is impossible and that GreenPiThumb is doing the best it possibly can, given certain inexorable limits of the physical world.
We ultimately decided to switch to a hybrid system. GreenPiThumb now waters the plant if the soil gets too dry or if seven days have elapsed since the last watering.
The final product 🔗︎
Below are some images of our completed GreenPiThumb build:


The timelapses have been the most fun part of this process. This one is from our first batch of green beans (R.I.P.). We didn’t realize how quickly the plants would outgrow the close overhead angle. We eventually switched to a larger bendy mount, which gets a better angle on the plant’s full lifecycle, but our original setup caught a great timelapse of the first few days of growth:
For the second batch, we kept the camera in the exact same position throughout growth. This is the progress of batch two so far:
Lessons learned 🔗︎
Nothing is as simple as it seems 🔗︎
I thought this would be a straightforward two- to three-month project, but it took us over a year to complete because nothing is as simple as it seems.
It’s a lesson I learned long ago from Joel Spolsky, software essayist extraordinaire, and it’s a lesson I expect to learn again and again on many software projects to come.
Electronics: start with the basics 🔗︎

At the start of GreenPiThumb, my only knowledge of electronics was based on faint memories of high school physics. I bought the Arduino starter kit and went through the tutorials to build a foundation in electronics.
These tutorials turned out to be quite enjoyable and useful. They do a good job of starting off easy and incrementally building to more advanced topics. I recommend this kit to any beginners who are interested in electronics.
Test hardware in isolation 🔗︎
Some who have worked with me on software projects have described me as “anal retentive” or “overly pedantic” when it comes to writing code. I prefer to think of my coding style as “rigorous.” We implemented the software part of GreenPiThumb first, rigorously peer reviewing and testing each software component piece by piece.
When it came to the hardware, we were very un-rigorous. I dare say we were a bit cavalier and laughably naïve. Our original process for testing the hardware components was to write a basic version of GreenPiThumb’s software, wire up all the sensors on a test board, run it, and see what it produced.
Nothing. It produced nothing. Because that was a terrible strategy for testing hardware. Every electronics component in a system has the potential to fail, either because the component itself is defective or because it’s been installed incorrectly. By connecting everything at once, we had no way of figuring out which piece or pieces were broken.
Over time, we learned to test our sensors in isolation. We created standalone diagnostic scripts for each hardware component. Every time we tweak the hardware now, the first thing we do is run through the diagnostic scripts to verify that we’re getting sane readings. When a new hardware piece is not working, we use our multimeter to systematically detect the root cause. We should have purchased the multimeter much earlier. It only cost $13, but would have saved us countless hours of frustration and headscratching.
Source Code 🔗︎
Parts list 🔗︎
The tables below show the equipment we used to build GreenPiThumb. We’re sharing the exact parts so that it’s easy for you to follow our model, but many of these are commodity components that you can swap out for something functionally identical.
GreenPiThumb essentials 🔗︎
- Raspberry Pi 3 Model B
- 12V water pump
- Raspberry Pi Camera V2 - 8 MP
- 100-240v AC to 12 & 5v DC 4pin Molex 2A Power Adapter
- MicroSD card (32 GB)
- Silicone tubing
- FQP30N06L N-channel MOSFET
- Raspberry Pi power supply
- DHT11 temperature and humidity sensor
- MCP3008 analog-to-digital converter
- Solderable breadboard (400 tie-point)
- Soil moisture sensor
- Rubber glove
- Molex to SATA power cable adapter
- Light-dependent photoresistor
- 1-gallon plastic water jug (for reservoir)
- Safety pin
- Rubber bands
Common electronics components 🔗︎
The items below are generic electronics tools and components that you can use for many projects. We bought them because we had zero electronics equipment, so we include them for completeness:
Netflix and chill wireHook up wire- Soldering iron
- Assorted resistors
- Wire stripper
- Soldering stand
- Jumper wires
- Heat shrink tubing (to cover solder joints)
- Wire cutters
- Solderless breadboard, 830 tie-points (for testing)
Gardening supplies 🔗︎
- 10" planter pot
- Potting mix (soil)
- Kentucky Wonder bush bean seeds
Optional components 🔗︎
- Third hand soldering tool
- We started with this basic clamp stand, but it was awkward to position and adjust. The bendy model was several times more expensive, but it made the task of soldering simpler and more pleasant.
- Bendy camera mount
- Great for holding the camera. Long and flexible enough to give you lots of options for finding a good angle and range.
- PEX tubing cutter
- Makes nice clean cuts to the water tubing.
- Digital multimeter
- We highly recommend you buy a basic multimeter. There’s nothing special about this particular one, but it served us well.
- Pi camera mount
- Allows you to attach the Raspberry Pi camera to a standard 1/4" camera mount, such as the bendy mount above.
- Pi camera extension cable (1m)
- Necessary for positioning the Raspberry Pi camera far away from the Raspberry Pi device itself.
- Zip ties
- For fastening tubing or wiring in place.
Acknowledgments 🔗︎
Big thanks to those who helped us with this project:
- Devon Bray, whose project, PiPlanter 2, heavily inspired the hardware aspects of GreenPiThumb.
- Dickson Chow, whose project, Plant Friends, was a helpful hardware reference, and who provided us lots of encouragement throughout the project.
- Nicole Michaelis, who volunteered her time to help edit this post.
- The /r/raspberry_pi reddit community for their help when we got stuck with wiring issues.
Be the first to know when I post cool stuff
Subscribe to get my latest posts by email.
Thanks for signing up! Check your email to confirm your subscription.
Whoops, we weren't able to process your signup.